

Arduino-based DIY Motion Gimbal Controller
Overview
This DIY project helps you build a motion controller for any of the AlexMos/Basecam-based gimbal systems - including handheld GoPro rigs, bigger DSLR ones, even quadcopter/drone setups. The only thing they all need is to have Bluetooth capability, so if you can tune it via Bluetooth, then you can use this controller to control it.
If you aren't familiar with the previous gimbal controller article, then I recommend you go watch the video and read that one first - there are many similarities between the two projects. Of course, the finished product is vastly different - with this, you will end up with a device that will transmit it's orientation in realtime to the gimbal controller, which will in turn move to match that. In practice what this means is if you tilt the controller to look down, so will the gimbal - turn the controller to the left, the gimbal will pan left. Overall VERY cool, and works particularly well when it comes to smoothly tracking moving objects, like people, vehicles, etc.
This is definitely a more involved build - you'll be soldering, flashing the arduino several times, etc - so if you've never done something like this before, I highly recommend that you build the other gimbal controller first to get your feet wet. I don't think one is better than the other, they're two different tools, so you'd be well served to have both if possible. All told it will probably take about an hour or two to build, and once it's done you really don't need to fiddle with it, unless you get a new gimbal.
Hardware
One AlexMos-based gimbal system
Adafruit Pro Trinket 3V
HC-05 Bluetooth Transceiver
MPU-6050 3 Axis Gyroscope/Accelerometer
Proto PCB + Project Box
SPST Power switch
Momentary Button
9v Battery connector
Breadboard
Breadboard Jumpers
Pistol Grip (if needed)
3v FTDI programming cable
Code
Features
The operation of this gimbal is VERY simple, there's only two controls, the on/off switch, which as you might have guessed, turns the device on and off. The second is the 'zero' button, which basically resets the starting position for the gimbal and controller - since the controller transmits it's relative location, and not absolute, it means you can the position of the controller so it makes sense relative to where the gimbal is. An example of this is when I have the gimbal on a roof or similar high structure facing down, I typically will zero the controller tilted up 45 degrees. This means when I hold the controller level, it will actually be tilting the gimbal down 45 degrees, which is quite handy.
Beyond the two buttons, the only thing else that matters is the orientation of the device - it's worth pointing out that it's ORIENTATION, not what it's pointing at, even though in many cases you can use it in that way. Just keep that in mind, and make sure that you check everything in a field monitor so you know that what you're shooting is what you want.
Wiring
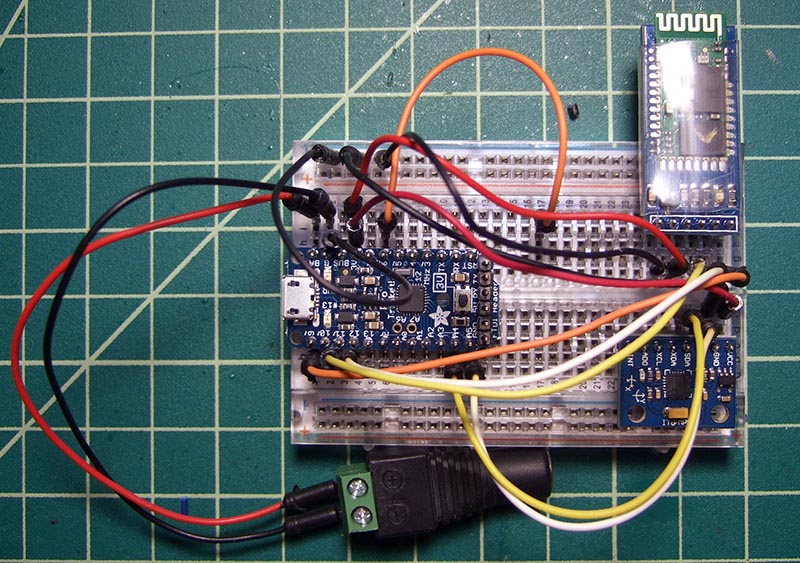
| Adafruit Pro Trinket 3V | ||||
| BT KEY | ~9 | BAT | Power + | |
| BT TXD | ~10 | Gnd | Power -/MPU GND/BT GND | |
| BT RXD | ~11 | BUS | ||
| 12 | 3V | MPU VCC/BT 3.3 | ||
| 13 | 8 | |||
| Aref | ~6 | Zero Button | ||
| A0 | ~5 | |||
| A1 | 4 | |||
| A2 | ~3 | |||
| A3 | TX | |||
| MPU SDA | A4 | RX | ||
| MPU SCL | A5 | Reset | ||
| MPU-6050 | ||
| INT | ||
| ADO | ||
| XCL | ||
| Trinket A4 | SDA | |
| Trinket A5 | SCL | |
| Trinket GND | GND | |
| Trinket 3V | VCC | |
| HC-05 BT | ||
| Trinket GND | GND | |
| Trinket 3V | 3.3 | |
| 5.0 | ||
| Trinket 10 | TXD | |
| Trinket 11 | RXD | |
| Trinket 9 | KEY | |
Conclusion
Hopefully you've found this tutorial useful and make your own awesome motion gimbal controller. If you have any questions, comments or suggestions - make sure to let me know! Have fun!
Last updated on Tuesday, March 9, 2021 12:24:41 PM PST. AnalogX trade is a registered trademark of AnalogX, LLC. All other trademarks are the sole property of their respective owners. All contents copyright ©1998-2009, AnalogX. All rights reserved.